

Building your own auth service can be tedious, complex and time-consuming. To save time, developers often resort to using third party auth services for auth. This post will guide you on how to add authentication to a VueJS app with SuperTokens.
What is SuperTokens?
SuperTokens is an open source project which enables you to add auth to your app quickly. It gives you a pre-built auth UI and backend APIs for an end-to-end integration experience.
Before we dive into the code, let’s discuss the overall architecture.
Architecture
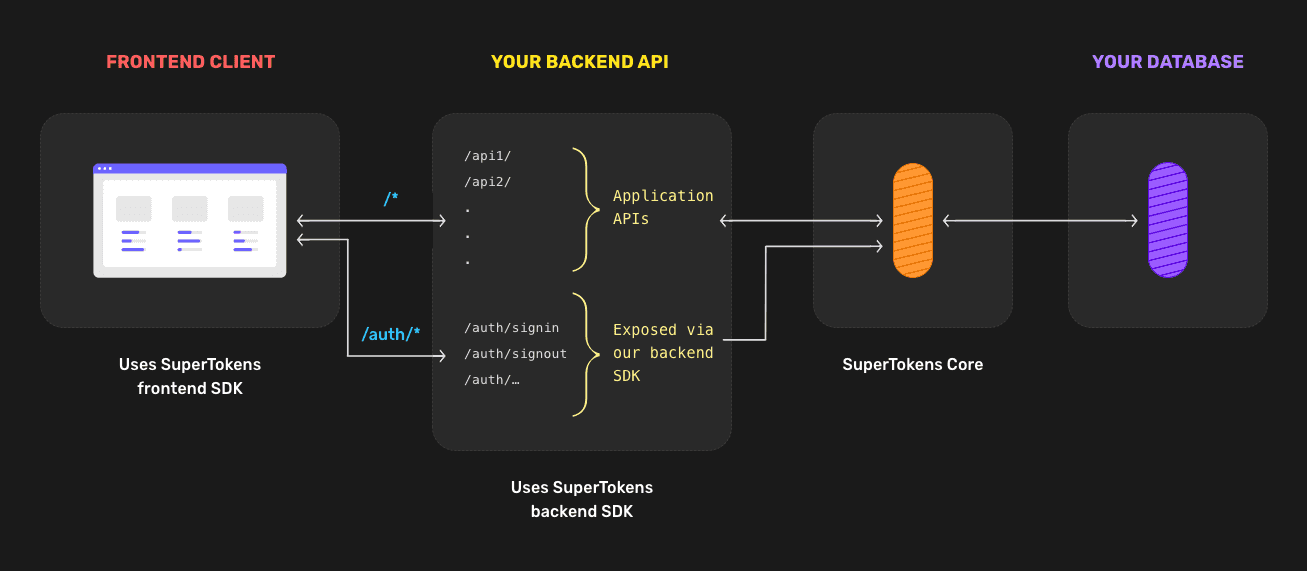
SuperTokens is built out of three components:
Frontend SDK
Backend SDK
Core microservice that talks to a database.
We’ll use the SuperTokens frontend SDK in our Vue app to add all the auth forms (login, signup, reset password etc). You can also build your own UI using the helper functions from frontend SDKs, but we will focus on the pre built UI in this blog.
The pre built UI are ReactJS components (provided by the supertokens-auth-react library
). In order to use them, we will have to render React components in our VueJS app.
For the backend, we will use the NodeJS SDK provided by SuperTokens (supertokens-node library). This SDK exposes all of the auth APIs (like /auth/signin, /auth/signoutetc) via a middleware, for the frontend to call. When these APIs are called, the SDK will talk to the SuperTokens Core microservice to read and write information to the database.
The SuperTokens core service can be either self hosted (and connected to your own db), or be hosted by the team behind SuperTokens (sign up on supertokens.com).
In order to keep the app’s bundle size small, we will limit the use of the
supertokens-auth-reactSDK to all of the auth related routes (/auth/*by default), and use a lighter weight, vanilla JS SDK (supertokens-web-js library) for all other routes in our app. Finally, we will then use code splitting and lazy importing to make sure that thesupertokens-auth-reactSDK is only bundled when visiting the/auth/*routes.
Frontend Integration
1. Setup and Install
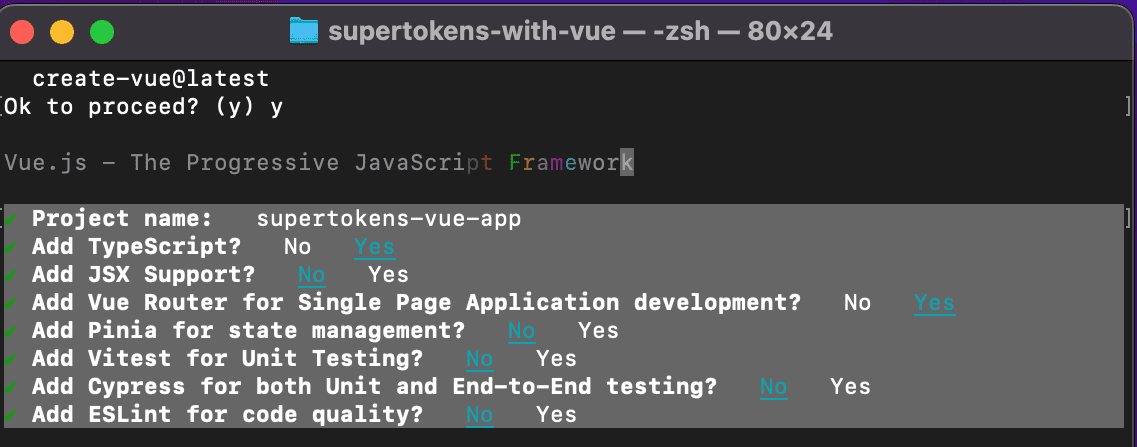
Create a new Vue + Typescript app:
npm init vue@latest
In the prompt, select Typescript and Vue Router:
Once that’s done, head inside the project and install the following dependencies:
npm i --save cors express npm-run-all react supertokens-auth-react react-dom supertokens-node
The supertokens-auth-react library will be used on the frontend to render the login UI, and the supertokens-node library will be used on the backend to expose the auth API routes.
2. Call the supertokens-auth-react and supertokens-web-js init function
Start by create the AuthView component inside /src/views folder. This component will render the SuperTokens React component to handle authentication on the frontend:
<script lang="ts">
    export default {
        // See next sections
    }
</script>

<template>
    <main>
        <div id="authId" />
    </main>
</template>
Notice that we have made a <div> element with the id="authId". This is where we will render the react components provided by SuperTokens.
Next, let’s create a file - /src/components/Supertokens.tsx which is the actual React component that we will be rendering. Inside this file, we will initialize the supertokens-auth-react SDK and use it in the React render function.
import * as React from "react";
import * as SuperTokens from "supertokens-auth-react";
import * as ThirdPartyEmailPassword from "supertokens-auth-react/recipe/thirdpartyemailpassword";
import { Github, Google } from "supertokens-auth-react/recipe/thirdpartyemailpassword";
import Session from "supertokens-auth-react/recipe/session";


SuperTokens.init({
   appInfo: {
       appName: "SuperTokens Demo App",
       apiDomain: "http://localhost:3001",
       websiteDomain: "http://localhost:4200",
   },
   recipeList: [
       ThirdPartyEmailPassword.init({
           signInAndUpFeature: {
               providers: [Github.init(), Google.init()],
           }
       }),
       Session.init(),
   ],
});

class SuperTokensReactComponent extends React.Component {
   override render() {
       if (SuperTokens.canHandleRoute()) {
           return SuperTokens.getRoutingComponent();
       }
       return "Route not found";
   }
}

export default SuperTokensReactComponent;
The snippet above uses the
ThirdPartyEmailPasswordrecipe (social + email / password login). You can choose another recipe as well by following the quick setup section in the guides on supertokens.com.
Next, we will load this SuperTokensReactComponent inside the AuthViewcomponent:
script lang="ts">
import * as React from "react";
import * as ReactDOM from "react-dom";
import SuperTokensReactComponent from "../components/Supertokens";

export default{
    mounted(){
        ReactDOM.render(React.createElement(SuperTokensReactComponent),
            document.getElementById('authId'));
    }
    beforeDestroy(){
        ReactDOM.unmountComponentAtNode(document.getElementById('authId') as Element);
    }
}
</script>
The above takes care of the /auth/* related routes. For all the other pages in our app, we want to be able to know if a session exists and extract information from it. To do this, we will use the supertokens-web-js SDK. We initialize this SDK in our Vue app’s root file /src/main.ts:
import Vue from "vue";
import VueCompositionAPI, { createApp, h } from "@vue/composition-api";
import * as SuperTokens from "supertokens-web-js";
import * as Session from "supertokens-web-js/recipe/session";

import App from "./App.vue";
import router from "./router";

SuperTokens.init({
    appInfo: {
        appName: "SuperTokens Demo",
        apiDomain: "http://localhost:3001",
    },
    recipeList: [Session.init()],
});

Vue.use(VueCompositionAPI);

const app = createApp({
    router,
    render: () => h(App),
});

app.mount("#app");
The config for the
Session.initcall, theapiDomainand theappNamefor both theinitfunctions (supertokens-auth-reactandsupertokens-web-js) should always be the same.
3. Setup Routing to show the Login UI
Vue CLI already generates the initial routing for our app inside /src/router.index.ts. We’ll update this file so that all /auth/* routes load the AuthViewcomponent we created earlier:
import Vue from 'vue'
import VueRouter from 'vue-router'
import HomeView from '../views/HomeView.vue'

Vue.use(VueRouter)

const router = new VueRouter({
    mode: 'history',
    base: import.meta.env.BASE_URL,
    routes: [{
        path:'/auth*',
        name:'auth',
        component: () => import('../views/AuthView.vue'),
    }]
})

export default router
The path for the AuthViewcomponent is /auth*. The * indicates that any sub / nested paths with /auth as the parent path should be rendered by the AuthViewcomponent. The AuthViewcomponent will in turn render the ReactJS component we created earlier which will use the supertokens-auth-react SDK to show the auth UI.
We lazy load the /auth route because the AuthViewcomponent loads ReactJS as a dependency. Lazy loading makes sure that these dependencies are only injected in the AuthViewcomponent when you visit the /auth/* routes. For all of the other routes, these dependencies are not imported thereby maintaining the overall bundle size of the application.
4. View the Login UI
If you now visit http://localhost:4200/auth, you should see the login UI as shown below:

Backend Integration
You can see the backend quick setup section in our docs on supertokens.com, or even copy the code from our example app. As a summary:
You need to initialize the
supertokens-nodeSDK and provide it therecipeList(similar to how you did on the frontend).Then you need to setup
CORS, add the SuperTokensmiddlewareanderrorHandlerto your app. The SuperTokensmiddlewareexposes all the auth related API routes (like sign in, sign up, sign out etc) to the frontend.Finally, you need to provide the
connectionURI(location) of the SuperTokens core. To get started quickly, you can provide ithttps://try.supertokens.com(this is a core that we host for demo purposes).
Once you’ve successfully setup your server, you can now try and sign up on the frontend.
Session management
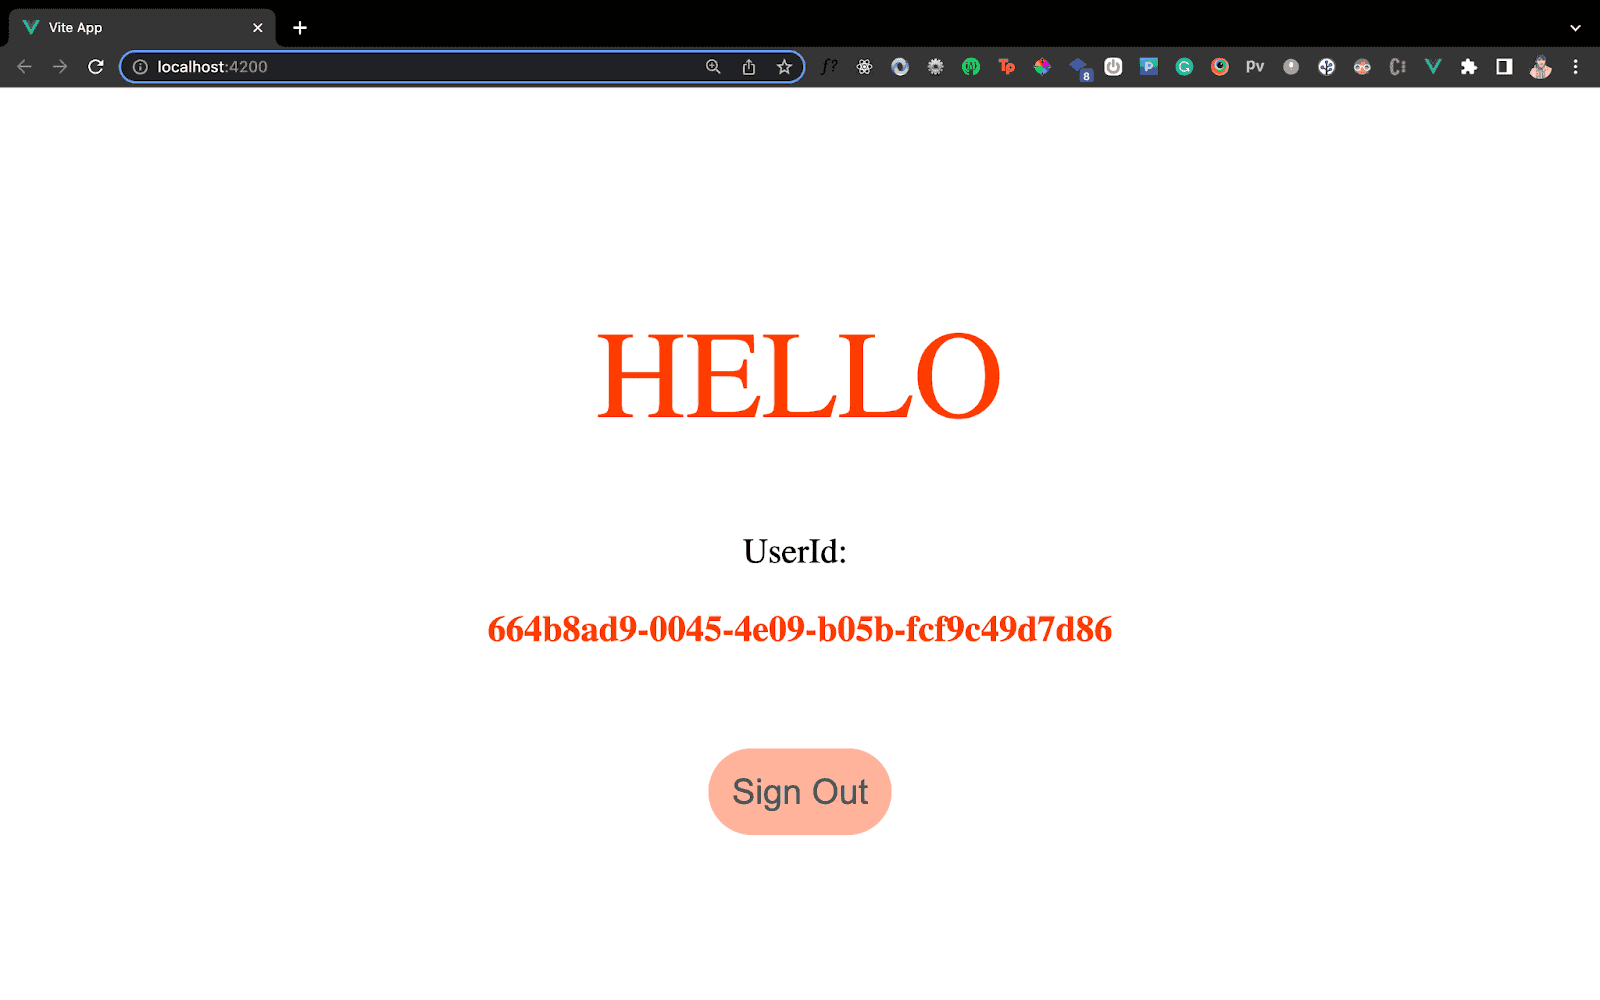
Inside /src/views/HomeView.vue file we’ll check if the user is authenticated and conditionally render a template. For authenticated users, we can show them a logout button with information about their session (like their userId). For unauthenticated users, we can show them a button to route to the /auth page.
<script lang="ts">
import * as Session from "supertokens-web-js/recipe/session";
export default {
    data() {
        return {
            session: false,
            userId: "",
        };
    },
    mounted() {
        this.getUserInfo();
    },
    methods: {
        redirectToLogin() {
            window.location.href = "/auth";
        },
        async getUserInfo() {
            this.session = await Session.doesSessionExist();
            if (this.session) {
                this.userId = await Session.getUserId();
            }
        },
        async onLogout() {
            await Session.signOut();
            window.location.reload();
        },
    },
};
</script>

<template>
    <main>
        <div class="body">
            <h1>Hello</h1>

            <div v-if="session">
                <span>UserId:</span>
                <h3>{{ userId }}</h3>

                <button @click="onLogout">Sign Out</button>
            </div>
            <div v-else>
                <p>
                    Visit the <a href="https://supertokens.com">SuperTokens tutorial</a> to learn how to build Auth
                    under a day.
                </p>
                <button @click="redirectToLogin">Sign in</button>
            </div>
        </div>
    </main>
</template>
To load the HomeView component on / we’ll update the /src/router/index.ts file:
const router = new VueRouter({
    // ...
    routes: [{
        path: "/",
        name: "home",
        component: HomeView,
    }, /*...*/],
});
If you now visit http://localhost:4200, you should see the following page:
SuperTokens Core Setup
Whilst doing the backend setup, we are using https://try.supertokens.com as the connectionURIfor the core. This is a demo core instance hosted by the team of SuperTokens. You can use this for as long as you like, but when you are committed to using SuperTokens, you should switch to a self hosted or a managed version of the core.
Conclusion
To summarise, we used the ReactJS SDK provided by SuperTokens to show the pre-built login UI for our Vue app. We also optimised the bundle size so that the ReactJS SDK is only loaded for auth related routes. Useful links:
Written by the Folks at SuperTokens — hope you enjoyed! We are always available on our Discord server. Join us if you have any questions or need any help.