Most web applications today require users to register in order to use certain features or visit specific pages, but building a login form is one of the most tedious things to do. In this article, we will build a simple and elegant sign-in screen using React and Bootstrap 5.
Prerequisites
- A basic understanding of HTML, CSS, and Javascript
- A basic understanding of React
- Setup NodeJS on your machine
Setup the React app
Run the following command to create a fresh react project:
npx create-react-app react-login
Navigate into the project and start the app
cd react-login
npm start
Once the build is ready, the app should look like this:

Install Bootstrap
Install bootstrap using npm:
npm install –save bootstrap
Edit App.js and add an import statement for bootstrap
import "bootstrap/dist/css/bootstrap.min.css"
We will also go ahead and remove the boilerplate code that the default React app adds to App.js. The file should now look like this:
import "bootstrap/dist/css/bootstrap.min.css"
import "./App.css"

function App() {
  return <div className="App"></div>
}

export default App
Setup Routes
First, we will create a new component Auth in Auth.js. We will work on the actual Auth component later for now we need this to set up routes.
import React from "react"

export default function (props) {
  return <div>Auth Screen</div>
}
In a real-world application, you would redirect users to your login screen if they were not already logged in. This is where routing comes into the picture, run the following command to install react-router-dom, and restart the react app after the installation is complete.
npm install --save react-router-dom
Modify the App.js file to set up the default and login routes. We will show the login UI on the /auth route.
import "bootstrap/dist/css/bootstrap.min.css"
import "./App.css"
import { BrowserRouter, Routes, Route } from "react-router-dom"
import Auth from "./Auth"

function App() {
  return (
    <BrowserRouter>
      <Routes>
        <Route path="/auth" element={<Auth />} />
      </Routes>
    </BrowserRouter>
  )
}

export default App
Create the Login form
Modify Auth.js that we created earlier
import React from "react"

export default function (props) {
  return (
    <div className="Auth-form-container">
      <form className="Auth-form">
        <div className="Auth-form-content">
          <h3 className="Auth-form-title">Sign In</h3>
          <div className="form-group mt-3">
            <label>Email address</label>
            <input
              type="email"
              className="form-control mt-1"
              placeholder="Enter email"
            />
          </div>
          <div className="form-group mt-3">
            <label>Password</label>
            <input
              type="password"
              className="form-control mt-1"
              placeholder="Enter password"
            />
          </div>
          <div className="d-grid gap-2 mt-3">
            <button type="submit" className="btn btn-primary">
              Submit
            </button>
          </div>
          <p className="forgot-password text-right mt-2">
            Forgot <a href="#">password?</a>
          </p>
        </div>
      </form>
    </div>
  )
}
Also modify App.css to include:
.App {
  background-color: white;
}

.Auth-form-container {
  display: flex;
  justify-content: center;
  align-items: center;
  width: 100vw;
  height: 100vh;
}

.Auth-form {
  width: 420px;
  box-shadow: rgb(0 0 0 / 16%) 1px 1px 10px;
  padding-top: 30px;
  padding-bottom: 20px;
  border-radius: 8px;
  background-color: white;
}

.Auth-form-content {
  padding-left: 12%;
  padding-right: 12%;
}

.Auth-form-title {
  text-align: center;
  margin-bottom: 1em;
  font-size: 24px;
  color: rgb(34, 34, 34);
  font-weight: 800;
}

label {
  font-size: 14px;
  font-weight: 600;
  color: rgb(34, 34, 34);
}
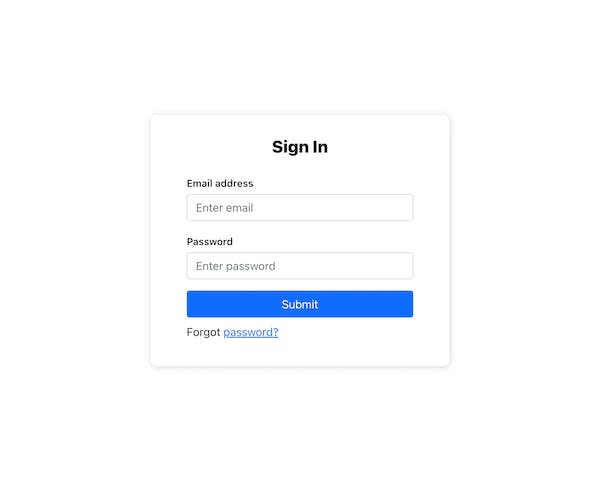
If you open the /auth route you should see the form

Add the signup form
Typically you want to allow users to register if they haven’t already. Modify the Auth.js component
import React, { useState } from "react"

export default function (props) {
  let [authMode, setAuthMode] = useState("signin")

  const changeAuthMode = () => {
    setAuthMode(authMode === "signin" ? "signup" : "signin")
  }

  if (authMode === "signin") {
    return (
      <div className="Auth-form-container">
        <form className="Auth-form">
          <div className="Auth-form-content">
            <h3 className="Auth-form-title">Sign In</h3>
            <div className="text-center">
              Not registered yet?{" "}
              <span className="link-primary" onClick={changeAuthMode}>
                Sign Up
              </span>
            </div>
            <div className="form-group mt-3">
              <label>Email address</label>
              <input
                type="email"
                className="form-control mt-1"
                placeholder="Enter email"
              />
            </div>
            <div className="form-group mt-3">
              <label>Password</label>
              <input
                type="password"
                className="form-control mt-1"
                placeholder="Enter password"
              />
            </div>
            <div className="d-grid gap-2 mt-3">
              <button type="submit" className="btn btn-primary">
                Submit
              </button>
            </div>
            <p className="text-center mt-2">
              Forgot <a href="#">password?</a>
            </p>
          </div>
        </form>
      </div>
    )
  }

  return (
    <div className="Auth-form-container">
      <form className="Auth-form">
        <div className="Auth-form-content">
          <h3 className="Auth-form-title">Sign In</h3>
          <div className="text-center">
            Already registered?{" "}
            <span className="link-primary" onClick={changeAuthMode}>
              Sign In
            </span>
          </div>
          <div className="form-group mt-3">
            <label>Full Name</label>
            <input
              type="email"
              className="form-control mt-1"
              placeholder="e.g Jane Doe"
            />
          </div>
          <div className="form-group mt-3">
            <label>Email address</label>
            <input
              type="email"
              className="form-control mt-1"
              placeholder="Email Address"
            />
          </div>
          <div className="form-group mt-3">
            <label>Password</label>
            <input
              type="password"
              className="form-control mt-1"
              placeholder="Password"
            />
          </div>
          <div className="d-grid gap-2 mt-3">
            <button type="submit" className="btn btn-primary">
              Submit
            </button>
          </div>
          <p className="text-center mt-2">
            Forgot <a href="#">password?</a>
          </p>
        </div>
      </form>
    </div>
  )
}
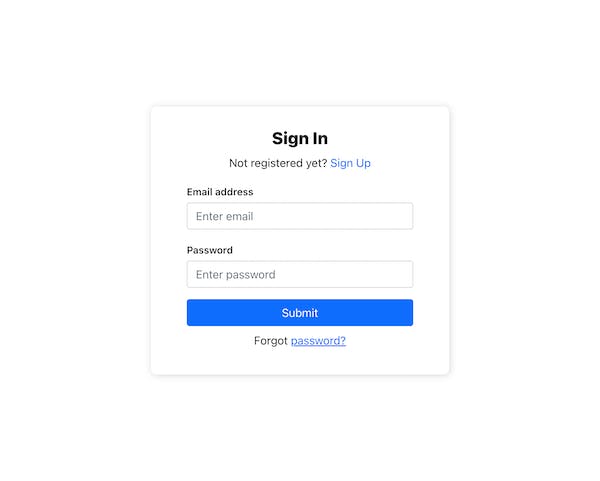
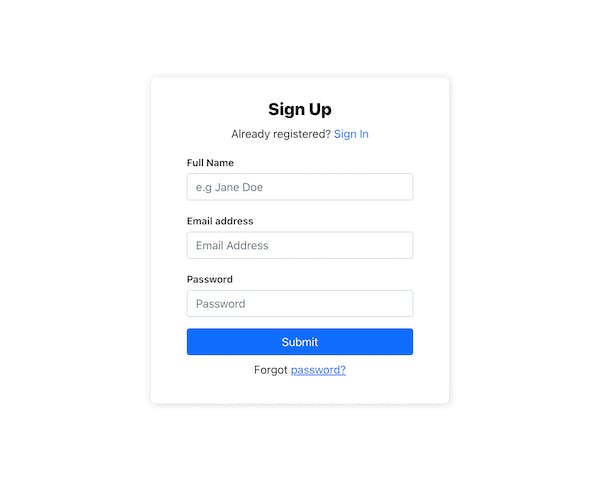
We use useState to change between signing in and signing up. Now when you visit /auth you can toggle between sign in and sign up.


Conclusion
We have created a sign in / up UI using React with Bootstrap. However, there is still work needed to actually get it to function - to make API calls and to do session management. To quickly get those set up, checkout SuperTokens
Written by the Folks at SuperTokens — hope you enjoyed! We are always available on our Discord server. Join us if you have any questions or need any help.
